|
Last edit: 10th Apr 2016 at 1:55pm |
| Viewed 5669 times since 11th May 2006, | ||||||||||
Ant's Marcel actually contains some pretty nifty filtering abilities, but it can be quite a confusing task to set it up in order to obtain maximum benefit from it.
Once you understand how filtering and aliases work, you'll realise just how powerful and flexible the Ant Suite can be. However, to a newcomer or non computer anorak it can look pretty daunting!
N.B.Please note that these instructions are written with the ordinary 'dialup' customer in mind, using a standard copy of the Ant Suite on a modem. They should work for other configurations, but have not been tested.
The idea behind the Ant Internet Suite (INS) is that you can log on to a (or more than one) mailbox account, download any waiting messages and then filter them off into the relevant local users INBOXes. For instance, you could have a single POP3 email box from which you subscribe to a number of mailing lists (eg. InetChat, Easiwriter, Photodesk and perhaps an interest such as Gardening), plus you might download personal messages to yourself and personal messages to someone else in your household.
Obviously, the best thing to do would be to filter all of these 'incoming' messages into their own mailboxes so that you can keep messages on a related theme all together.
To do this you would want to create a selection of 'local users' and then filter all incoming mail into the required local users INBOX.
The first area of confusion is generally in working out what's what within the Ant Suite. If anything, Ant have designed it to be too flexible. There often seems to be several ways of obtaining the same result - often completely confusing the newcomer or novice user, in the process.
You really need to understand that the whole Ant Suite works in a kind of modular fashion. You can configure various parts of it seemingly independently of others. This can often either confuse the user, or confuse the computer (even worse!) as it's understandable for a newcomer to mistakingly think similar settings in different parts of the suite mean the same thing - which is not often the case, as we shall see....
We shall configure the main InetSuite first. This is the 'Configuration' icon you see in the main INS panel (ie. the one you get when you click SELECT on the 'Internet' icon). Marcel configuration ('Choices' from the Marcel menu) is actually quite simple in comparison and can be left until last.
The thing to remember is that all mail downloading and delivery, including filtering into local mailboxes, is handled by InetSuite itself. In comparison, Marcel is pretty simple and purely an email client for reading and replying to messages. It doesn't actually do any filtering itself.
Also any passwords that Marcel may ask for are completely local to your system - in other words, to prevent access from other people in your household who may also use your computer. The important passwords are those entered into the main INS configuration. These are the ones that matter in terms of actual connection and downloading of messages from the remote ISP.
When you get an account with an ISP you will be assigned a POP3 mailbox. Usually this will have the same username and password as your main login ID and password.
N.B. Some ISPs provide more than one POP3 mailbox. This works in the same way and you can just work through these instructions for each POP3 account you have. Indeed, you can even check mail to a different ISP to the one you connect to.
Firstly, load the Configuration program and click on 'Mail Setup'. You should see the window in fig.1
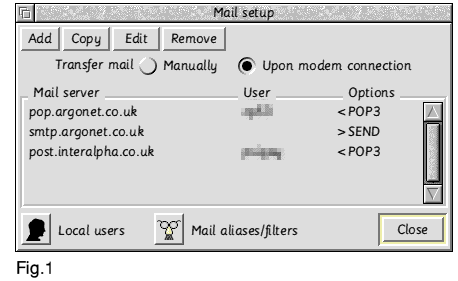
This is where you setup your POP3 mailboxes, so you will need to know the username and password that your ISP provided you with. In this example you can see that I've configured my copy to check both my Argonet and Interalpha accounts from the one copy of InetSuite. (I've removed the usernames for security, because I'm paranoid! :-) )
Basically, in order to configure this part of the InetSuite you will need three things from your ISP; The name of their mail server (the computer at their end which actually stores your mail messages), your POP3 username and your POP3 password.
Basically, you can either add a new one by clicking on the 'Add' icon at the top of the window, or you can double-click on an existing entry to edit it. Either way, you will get the window shown in fig.2.
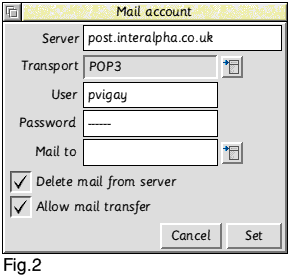
The details you enter in this window are the most important, because if you get these wrong, you will not be able to download any email because the remote ISP will not let you log in.
Personally, I generally leave the 'Mail to' icon empty. The small menu icon on the right will allow you to select a user from the list of local users setup. If one is chosen, any email downloaded from the remote POP3 account will be placed in this users INBOX. From my experience though, it's more flexible to leave it blank, for reasons I'll explain later.
Also note that the user 'pvigay' is not to be confused with any local user you may have created called 'pvigay'. This is the name of the remote POP3 mailbox.
You can setup as many POP3 accounts as you like. As you can see, I can check my Argonet email from logging onto Interalpha - or vice versa. All we need to do now is to work out where the different messages will actually end up....
You now need to think carefully about what local users you wish to setup; perhaps one for each member of your family, or perhaps to categorise different types of email you wish to receive; such as those from different mailing lists or different accounts.
Click on the 'Local users' icon in the configuration window and you should see the 'Local users' window (fig.3). Initially it will probably only contain a single (root) user. You can leave this alone and merely add your own users.
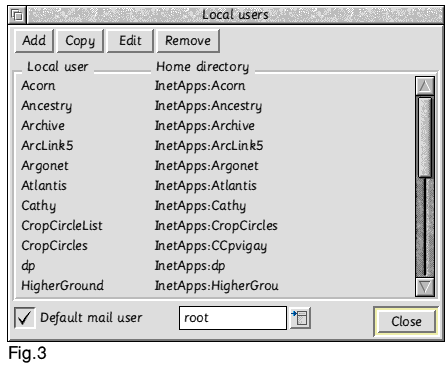
As you can see from my diagram, I've setup quite a few local users, to cope with the various mailing lists I'm a member of. You can create more in future so don't worry if you suddenly think of something else just as you've completed your setup. The only reason I recommend setting up local users first is so that when we come to do the actual filtering we already have the relevant user mail boxes to deliver the messages into.
Actually creating the local users is reasonably straight forward. Merely click on the 'Add' icon at the top of the window and enter the relevant information. I've kept everything within the default 'InetApps:' directory as it's easier to use an Inet directory reference in case you move all your files onto a different drive, or just rename your main hard drive. However, I've given mine slightly more sensible names than the default 'UserDir'.
We are now ready to actually set up the filtering itself. This is the bit that can often lead to confusion, as many people's common complaint is that all their messages end up in the 'root' user mailbox. This is most often caused by something simple being overlooked in the actual filtering.
Filtering is controlled via the 'Mail aliases, mailing lists and filters' window (fig.4). This is found by clicking on the 'Mail aliases/filters' icon at the bottom of the 'Mail Setup' window in the InetSuite configuration.
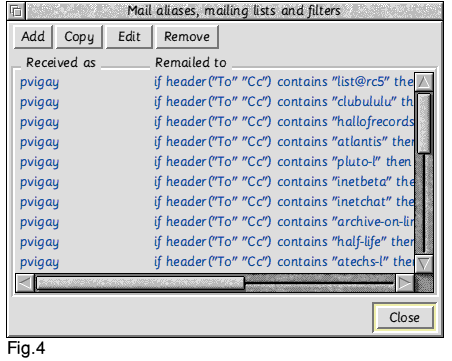
This window initially only contains a single entry; Received as "*", being remailed to "root" user.
Although this window looks rather complex, it's actually remarkably simple once you understand the concepts behind it.
Basically every message that InetSuite downloads is addressed to a particular user. This is the user you entered in the POP3 box (fig.1 and fig.2) which in this case is 'pvigay'. Unless you are logging into more than one POP3 mailbox you will only have one user. Please note that 'user' in this sense does not refer to the local users that you set up in fig.3 - even though you might have a local user with the same name as your POP3 user.
What InetSuite will do with each message received, is to start at the top of the list and gradually scan down the list of aliases until a match is found. As soon as a match is found, the email will be filtered off into the relevant local users inbox. Received as "*" means any user (ie. every email received). This is why the bottom entry is generally always "*" Remailed to 'root' - so that if a message gets to the bottom of the list of aliases without being filtered, it will automatically be moved into the 'root' user (unless you've renamed 'root' in section 5).
If you click on 'Add' at the top of the window you will get the window shown in fig.5
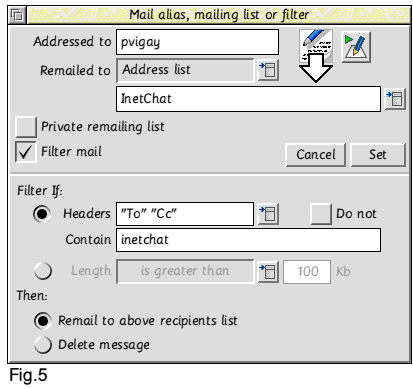
This actually shows the window expanded. When it first opens you will only see the top half until you tick the 'Filter mail' icon.
This is where the actual filtering is performed.
Although it looks daunting, it's quite self-explanatory; 'Addressed to' at the top, simple refers to the user you wish to filter. As explained this will be your POP3 user (or "*" if you wish every email to be checked). In most cases you will want email to this user 'Remailed to' an Address list (see advanced usage for additional options). Next select the local user that you want any messages that match the relevant criteria to be moved into. The icon on the right will let you select one from a list of those created in section 5.
When you tick the 'Filter mail' icon the bottom section of the window will appear and you can enter your matching criteria. This is where you need to think carefully about what you want to detect in the header of the message. There is not really a right or wrong way to do this because there can be more than one way of achieving the same end result.
Generally speaking you would always leave the 'Filter If:' Headers option ticked. This will scan the headers in any message matching the relevant (Addressed to) user. The actual headers scanned are the ones displayed in the box to the right. By default this is "To" "Cc" and you generally leave it as this. You now need to think of the actual text you want to check for, and enter it in the 'Contain' icon. This would generally be the email name (ie. the bit before the @) of what you wish to filter.
Referring back to my own filters in fig.4 you can see that I've got one (the 7th) for the Ant Chat mailing list. Hopefully you'll be able to see now why we shouldn't enter just inet - as it would possibly get confused if we were subscribed to both InetChat and InetBeta, and wanted the emails to go to separate inboxes (like I've done).
This where you need to think carefully - and bear in mind that scanning will start at the top of the list and stop as soon as it finds a matching criteria.
The last option to select is what you want to happen to any message that matches your criteria. Tick the relevant icon at the bottom. The 'Remail to above recipients list' is the usual one and will move the message to the relevant inbox that you selected in the 'Remailed to' icon. If you tick the 'Delete message' option, then it will do just that and delete any messages that match the criteria.
This is basically all you need to do for each filter you wish to setup. :-)
You may be wondering how you can set up the list of filters in the order you require. For example you may wish to create a filter matching InetChat as described above, but instead of defining a second one for InetBeta you may just wish ALL other messages addressed to 'Inet' to go into a general Ant stuff inbox. In this case you could filter on Inet - but you would need this filter AFTER the InetChat or else everything, including InetChat, would end up in the general user inbox.
To add a filter at a specific position in the list (fig.4) you first need to highlight an entry BEFORE you click on 'Add'. When you enter a new filter now it will get added BELOW the one you've highlighted. If you don't highlight one first it will just get added to the very top of the list.
If you wish to filter all messages that DON'T contain a particular string, then tick the 'Do not' icon to the far right of the 'Headers' selection. However you should bear in mind that this might need to come towards the bottom of the list, or else you may find that all your messages get moved into the selected inbox, as obviously a majority of messages might NOT match the criteria - thus would match the filter and get moved accordingly.
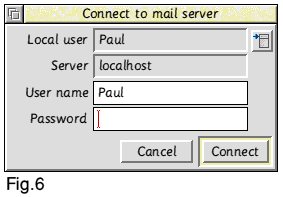
Figure 6 shows the normal login window you get from Marcel when you click on it's icon when it's grey.
This is where you can select the local user inbox that you wish to read the messages in. On a personal (ie. home) system it's generally best to leave the password box empty. Note that this is the LOCAL USER password (as described in section 3) and NOT your ISP or POP3 password (which sometimes confuses newcomers). Thus when you're setting up the local users in section 5, make sure the passwords are all blank (unless of course you DO want passwords to stop other users of your computer getting access to your emails).
That's about it really. I hope these instructions have made setting up the filtering options slightly clearer than mud. If there is something you still don't understand, or you would like to point out an error or confusing bit in my instructions, please DO email me and tell me. That way I can hopefully improve these instructions for others to understand a bit easier. After all, I generally know what I'm doing (I hope) so I might have glossed over something which may not be so clear to a newcomer or someone less familiar with the workings of the InetSuite.
I hope you find these instructions useful.
|
Last edit: 10th Apr 2016 at 1:55pm |
| Viewed 5669 times since 11th May 2006, | ||||||||||
|
| ||||||||||||||||||||||